


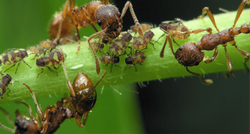
 Aphids can be a huge pain to gardeners, especially during the Summer months. A little good weather and your rose and other plants will soon become the next best meal for aphids. The insects could be blackfly but more often than not they will be greenfly overrunning your flowers or rather stems and buds. They literally suck the life out of plants such as roses so prompt action is vital.
These days many people try to steer clear of damaging insecticides and pesticides. Those products can do more harm than good. Encouraging ladybirds in your garden will help beat or even stave off an aphid attack. These little insects will chomp their way through the aphids. However, more often than not the greenfly will outnumber ladybugs almost a million to one, or so it seems. One safe, and quick way to remove greenfly is using a mild solution of washing up liquid. Just a small drop of the liquid added to water in a spray container could do the trick. Shake the solution before spraying so that it is nice and foamy before spraying directly on to any greenfly infestations. Simply spray with water to remove, after a couple of minutes or leave and hose off when you water your garden. Alternatively you can wear gloves and squash these little garden pests but it is a messy job. Once again spray with water to remove any residue. A regular spray with the mild soapy solution should keep your plants greenfly free all summer. Gardeners will always tell you that prevention is better than cure. Just be careful that any anti-greenfly sprays you purchase are eco-friendly too. If you find that a soapy spray is not working well for you try planting garlic and plant close to roses to deter aphids. You can even make a garlic spray to clear greenfly away. “A spray made from as little as a 6-8% concentration kills greenfly, it also keeps beetles and snails off other plants. It keeps greenfly off roses if planted near the bushes" Try the environmentally friendly alternatives before buying expensive and damaging products. If all else fails go back to the squashing greenfly between finger and thumb technique. It takes a little time but hurts nothing but the aphid population. Perhaps more importantly it is free,
0 Comments
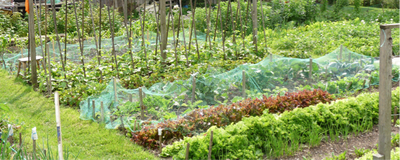
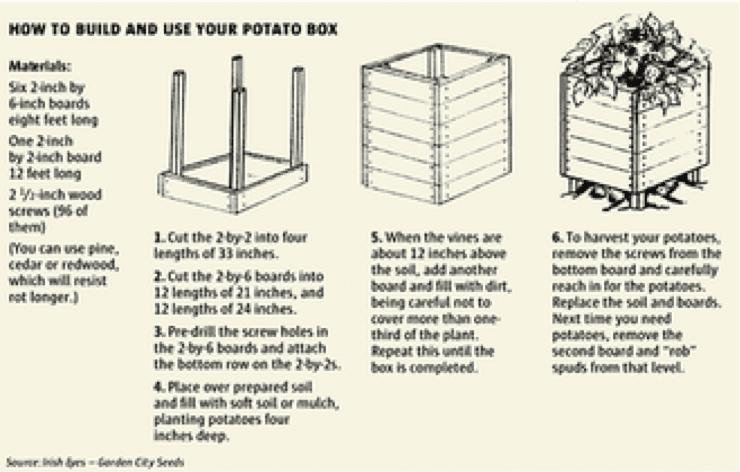 Why bother?
In tough economic times growing a selection of fruit and vegetables can be cost effective. It can also be easy and fun. You will need
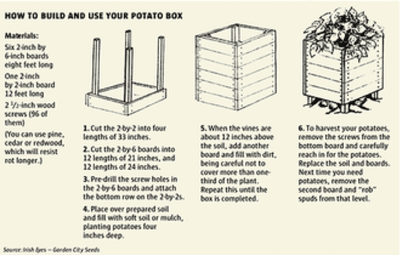
It's easy when you know how Growing your own vegetables has become more popular again, lately. With most people feeling the economic pinch many are looking at ways to save some money. Growing your own potatoes will give you a tastier potato than the shop bought variety, save you some money and is suitable for the smallest of gardens or yards. Like so many things though preparation is the key to yielding a good crop. A little time and effort spent initially will go a long way. Once your potatoes are established they will need the minimum effort on your part. Fresh new potatoes straight from the earth can be easily achieved and are well worth the effort. Where to plant Deciding on the best place to plant your potatoes will depend upon various considerations such as:
Potatoes need to have some shoots showing before they are planted. The practice of encouraging shoots to sprout is called chitting.
Planting in the garden Plant the potatoes in dug trenches that are up to 13 centimetres deep. The exact depth will depend upon the variety of potato. Check the packaging of the potatoes for any specific advice. The space needed between each potato will again depend upon the variety. Once the trenches are dug and prepared with some fertiliser:
Your crop should take about 3 or 4 months to grow and become ready for lifting. A lot will depend on the time of year. For early crop potatoes lifting can take place early in the season. In fact as soon as the shoots showing above the ground are green and in flower. For later crops you can leave the potatoes in the ground, even if the top growth looks well past its best. A couple of weeks before you are going to lift the crop, cut the top growth off at the ground. Doing so helps the potato skin to toughen up. This should make the potatoes less prone to damage as you lift them and extend their shelf life. Tips and advice
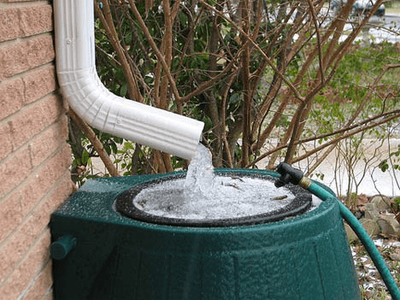
 It may be hard to believe in the UK as you are getting drenched in the latest downpour of rain but we are often only a matter of weeks away from severe drought.
Managing water stocks is becoming ever more important in the 21st Century. Global warming and climate change means unusual weather patterns. These changes can result in excessively heavy rainfalls in summer and a lack of valuable water during the winter months. The need to conserve water has never been greater. If you are building a new home consider installing a full rainwater harvesting system. Even if your home was constructed many years ago you can still make some adaptations. One of the best ways to conserve rainwater is to harvest it. Harvesting rainwater can help you manage garden water supplies efficiently. This can mean that you have a plentiful supply of rainwater throughout the seasons and the year. Rainwater will not be suitable for drinking water but can be used, for example, to water your garden, clean windows and wash paths. How to harvest rainwater In order to harvest the rainwater which regularly flows away from your roof you will need at least one water butt or barrel. Depending upon the size of your home more than one rain water butt may be appropriate. Most people decide to extend their water harvesting and incorporate a garden watering system which runs from the water butt. What you will need
Rainwater barrels and butts The rainwater barrel or butt can be as simple as you want. In order to minimise costs many people utilise something appropriate which they already own. Making your own water butt can save you money but make sure that it also fulfils its purpose. If you decide to buy a purpose made water butt or barrel check out the alternatives on line. You may want to install a few small versions or just one large water butt. Ask your local council if they are running any environment friendly schemes which enable you to purchase a water butt from them cheaply or even get one for free. Installing a water butt Installing your water butt will be fairly easy but consider:
General advice  Did you know that Radishes are classed as one of the super-foods? This small peppery tasting salad vegetable is often maligned and under used but it should be eaten liberally when in season.
What can be most health giving though are the roots and the leaves of these small plants. These are almost always discarded when you prepare radishes for eating by top, tail and washing them. The leaves of the plant though contain more Vitamin-C, protein and calcium than their roots. Radishes contain Vitamin-C, zinc, B-complex vitamins and phosphorus. In fact you can find a wide range of uses and health benefits detailed here. Apart from eating radishes, they may become part of your beauty regime. What we love about radishes though is their distinctive taste added to the fact that they are quick and easy to grow. You will not need a huge garden or plot of land. If you monitor the radishes growth and plant new seeds at regular intervals you will have a bountiful crop. Here is one of our earlier articles regarding growing radishes from seed: Well let's get started. First let's make sure we all know what radishes are. They are those small round red. pink or white, slightly peppery tasting salad vegetables. Good radishes are firm and crunchy to bite into. As with most vegetables radishes have quite a few different varieties. What all radishes have in common though is that they are all quick and easy to grow. You do not need a large garden as they can be grown from seed in trugs, troughs, planters and the like. Convinced? The seeds You can buy a packet of radish seeds fairly cheaply from garden centres or supermarkets. As a rough amount a packet of seeds containing 500 seeds will cost you about 40p. We opted for a packet of seeds from Asda for £1 that contained lettuce, spring onion and two different varieties of radish seeds. Containers You can grow vegetables such as radishes even if you do not have a garden, They do not require a massive amount of space. Plastic round trugs which retail from between £2 to £8 are perfect for the job in hand. Remember to drill a couple of drainage holes in the bottom though before planting. Compost Radishes grow so easily that a basic multi-purpose compost will be fine. Buy a huge bag as it works out cheaper. Best location Radishes will thrive in a sunny spot. Summer in the UK can be a hit and miss affair so choose an area that has the most sunlight. Ensure though that they will not get too much sun on a daily basis. Radishes might like sun but they do not want to get too hot. Planting Ideally plant in rows at a depth of around 1/2 an inch. Cover with soil or compost. Aim to leave a space between each seed. Some radish seeds are a fair size and this is easy to do with these seeds. Helpful advice
Take care not to disturb ant surrounding radishes that are not yet ready to harvest. Gently put your hand around the radish under the soil or compost. You will be able to assess if the radish is large and mature. If it is gently pull up. Snap the top leaves and bottom root of for washing and eating. Throw the discarded leaves and roots into your composter. Overall As radishes are so easy and quick to grow they are perfect for beginners and children to grow. So? What are you waiting for? Grow radish from seed Grow lettuce from seed  When you think of the plant Lilac you probably imagine a plant with flowers which are coloured lilac. That variety is typical and can be heavily scented when in flower. However Lilac comes in other colours such as white, pink and even yellow.
Over time a Lilac plant may become woody and, if you are not careful take over your garden. Roots will rapidly spread under the top surface of your garden and you may find new growth springing up quite a way from its source. It is possible to plant into a large pot or restricted area and of course pruning each year will help. Left to its own devices a Lilac will soon become a fair sized shrub and ultimately a tree. If you want it to grow large, plant well away from buildings and walls. Lilac will flower in late Spring or early Summer. The large blooms will last for a few weeks before turning brown and dying back. Lush green leaves mean that your plant will stay green most of the year. It will shed its leaves in Autumn though and during winter be nothing more than bare branches. Early in Spring buds of new growth will appear and during April the flowers will begin to form. According to Wikipedia, "Syringa (Lilac) is a genus of about 20–25 species of flowering woody plants in the olive family (Oleaceae), native to woodland and scrub from southeastern Europe to eastern Asia, and widely and commonly cultivated in temperate areas elsewhere". Choosing the right location to plant a Lilac is not too difficult. They thrive in partial shade but will happily grow in full sun or shade. Perhaps the most important factor, in deciding where to plant, is those potentially damaging roots and the fact that your small shrub could all to soon be a large tree. Make sure you bear this in mind. Professional planting advice here  As winter turns to spring, each year, the weather can be disastrous to young plants and seedlings. The evenings can still be quite chilly and the night-times often still have sharp frosts, even well into spring. Despite this unpredictable weather, advice offered by gardeners will usually be that such times of the year are perfect for getting those seeds planted. However, unless you have a fully heated greenhouse seedlings will not survive cold climates. Starting this year's crop off by planting the seeds indoors offers a perfect compromise. Try to time it so that by the time your seedlings are ready to be planted out, there will be no risk of frosts.
Choosing the right seeds for you Remember to check the date on any packet of seeds that you buy. Cheap seeds are not always the bargain that they seem. If the use-by-date has passed your crop may be poor. Read what compost is needed for the initial planting, when to prick out the seedlings and the seedlings preferences. Some will require full sun whilst others may prosper in semi-shade conditions. The packet should also state whether or not the seeds are suitable for indoor planting to get them started. Containers Use old, clean plant trays, egg cartons and egg trays, or buy purpose made, cheap seed trays. It is possible to utilise old yogurt cartons and margarine tubs also, as long as they are cleaned thoroughly. Be innovative and see what resources you have to hand. Compost Make sure that you only use a compost produced for planting seeds, because others may be too rich for delicate, young plants. Starting your seeds off Place the planted seed trays in a darkened, warm room if possible. An under stairs utility cupboard can be perfect. If you do not have a darkened area lay newspaper over the seed trays in order to minimise light levels. Research your particular seeds fully just in case they have different requirements. Water sparingly at this stage and then leave for a good week before checking to see if any small shoots are peeking through the compost. Moving into the sun As soon as you can see small, green, shoots poking through the compost, move your seed trays into somewhere more appropriate. For many people the best spot will be on a kitchen windowsill, in a nice sunny spot. Remember that now you will need to water your plants more regularly, but still only sparingly. Stand the seed tray onto another tray, and use this for watering. Your small plants will fair better if the water is sucked from below, as opposed to their compost being watered. This way only the water that the seedlings need will used. Follow the sun If necessary, move your seed trays, as the day's sun moves around, to another spot in your home. Alternatively, add artificial lighting, such as fluorescent tubes. However, unless your crop is large, this is not really necessary. Prick out When your seedlings are large, and strong enough to handle prick them out and plant into slightly larger pots. This will help save and protect as many of your young plants as possible. By now the frosts should have disappeared, your seedlings should have grown into small plants and it should be safe to plant your crop outdoors. If necessary leave the plants in their pots outdoors for a short while until they become acclimatised. 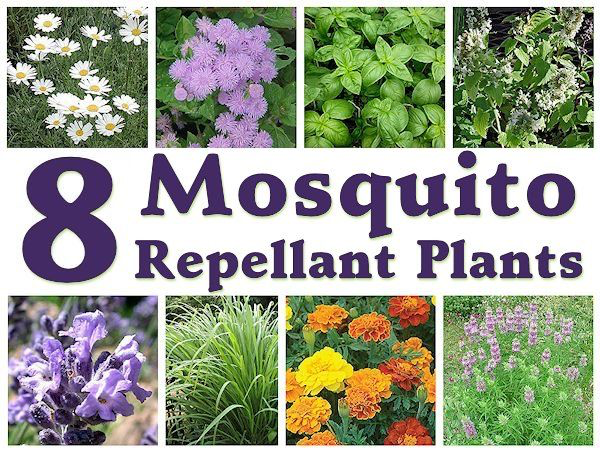 The number of mosquitoes in the UK is increasing, as is the number that may cause you harm.
Mosquitoes are a nuisance but some people have a strong allergic reaction to a mosquito bite. In order to minimise the presence of mosquitoes in your garden think about what you are planting. There actually are quite a few plants that you can grow which will repel mosquitoes. Here are just a few: Plain, ordinary CATNIP is perhaps the most popular. You can usually grow this perennial fairly easily from seed and it works wonders. These plants are a repellent which you can also use on your skin. Crush the leaves of the plant and rub the mixture onto your body for a cheap and natural mosquito repellent. Similarly ROSEMARY has these properties. Both these plants are useful in other ways too. Many people have geraniums growing in their gardens. Geraniums are easy to grow and offer beautiful flowers in the summer. However, there is a type of geranium called a MOSQUITO plant, which has good repellent properties as well as its beauty. This geranium acts like CITRONELLA but will grow in a more diversified climate. With MARIGOLDS you can add beauty to your garden and an aroma which will deter aphids as well as mosquitoes. This will have the added benefit of helping your roses to flourish. Marigolds with their brightly coloured yellow to orange flowers are easily grown from seed or seedlings each year and will last throughout the whole summer. Another pretty flower that repels mosquitoes is the blue and white annual, AGERATUM. Apparently mosquitoes hate this plant's smell. One that I have personally encountered whilst researching this subject is THYMUS CITRIODORA. This hardy perennial, which is a member of the THYME family, has such a high citronella content that its repellent properties are renowned throughout the world. GARLIC is a handy and safe mosquito repellent, so it possibly works well in your garden also, but this is just supposition. It is however possible to design your garden so that certain pests are deterred. Growing PEPPERMINT can deter spiders. You may say spiders are a gardeners’ friend but that depends on the type and their number. COMPANION planting is easy to do and useful for this. In other words plant something alongside of your fruit and vegetables which will deter bugs and mosquitoes from devouring them. A good example is lavender. If this is planted near to roses the lavender should deter aphids from eating the roses. A visit to Turkey some years ago portrayed perfectly the use of Eucalyptus as a mosquito repellent. There were areas of the countryside with rows of EUCALYPTUS trees. One area in particular had been swamp land and was a hotbed for malaria carrying mosquitoes until the trees were planted. As this plant or tree needs a lot of water to grow well, the ones they had planted had not only got rid of the mosquitoes but made the land more viable. Ask at your local garden centre for advice on which EUCALYPTUS variety will suit your garden. It will smell divine and hopefully control the level of mosquitoes but remember, it may sap your garden's moisture. Mother Earth News More http://www.naturallivingideas.com/11-plants-that-repel-mosquitoes/  Background
Around February each year the weather in Yorkshire can start to improve. It may start out cold, almost frosty, but as the sun rises often so does the temperature. Once the sun shines crocuses may open up, in all their glory. They look so sweet, fully opened and embracing the sun. This humble flower which is so often overlooked is a pretty addition to a late winter garden The crocus Crocuses are bought as very small corms. A corm is lightly different to a bulb and tends to be smaller. A packet of these corms will usually contain about fifty and be quite cheap to buy. Crocuses originated in Europe and I suppose that is one of the reasons they seem quite happy with or strange temperate climate. However they are really from the more southern regions of Europe. My Crocuses are among the many plants which were swamped in previous flooding but survived so I guess they are quite hardy. They are also perennials which mean that they keep coming back into flower each year. The crocus is from the Iris family, or Iridaceae, and I can see that connection in the flowers. The name crocus is from the Greek, Krokos. This relates to the fact that the spice Saffron is taken from a particular crocus, the Saffron Crocus. I used saffron for years to colour white rice to yellow before I realised where it came from. I was fascinated to see that there are about 80 different types of crocus, although only about 30 of these are cultivated. No wonder you often come across strange looking ones on the Greek Islands, for example. I have yellow, purple and white crocuses in my garden. They have small, narrow, green leaves with a white stripe running down the centre strip. The flowers when closed almost look like a small Tulip when there is no sun around. However when it is, as today, lovely and sunny, these flowers open up. There will be about 6 to 8 petals which are paler toward the centre. The stems are about 3 to 4 inches long depending on the variety and the flowers are about the same height. Generally Crocuses flower in Spring though there are some Autumn varieties. Some of these Autumn crocuses are not strictly speaking crocuses though. They are a great little plant for adding early colour to window boxes, planters, laws, flower beds and borders. They can be planted in bulb fibre indoors in bowls. The great thing about them is they are so tough. If they are planted in grass you can just mow them with the grass after they have finished flowering. You may not want them in your lovely lawn but may welcome then in natural grassy borders. Crocuses tend to like plenty of sun hence their pretty opening up on a sunny day. They tend to like good soil with plenty of drainage. Still they must be quite tough as they survived being underwater for quite a while with the floods. Crocuses can be propagated by dividing the corms which grow at the foot of the plant in late summer. For me the best time to plant is early Autumn. I usually try to stagger planting of corms and bulbs through Autumn so that there are always some just about to flourish once Spring is on the way. Overall There are no rules with Crocuses. You can plant them close together or not. I have some at the base of a large plant and I have these planted individually around with regular spaces between them. I also have some that are planted in small groups of 5 or 6 together and the groups are close also. If you want to split colours into groups make sure that you buy the appropriate corms. However, for me I like to have the three colours growing in a mish mash of colour. Once they flower the flowers will last a few weeks and then all too soon they are gone for another year. If you do not want to do anything you can just leave them and they will wither away and faithfully return the next year. Along with snowdrops and daffodils, Crocuses say to me Spring has arrived and Summer will be following on behind' Crocuses are recommended as an easy to care for, trouble free little plant that can lift your spirits on a cold day. Please note as with all bulbs and corms, keep out of children's and pet's reach as ingestion can cause problems or may poison. 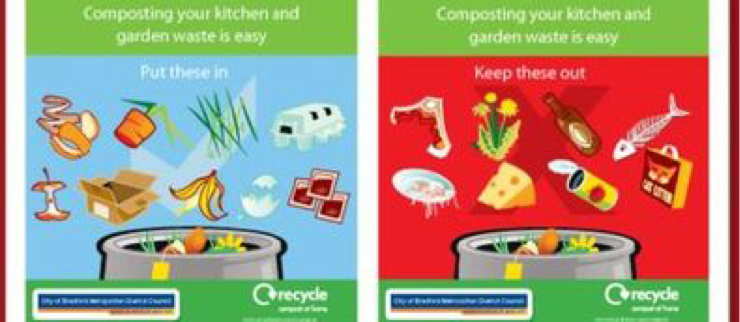 Why bother? Many items which would normally fill up your trash can, or dustbin, can be used to make great compost. It is not as time consuming as you may imagine. Once you get into the recycling mode it may spread to other parts of your life. Composting means that you can:-
Getting Started Purpose made composters come in all shapes and sizes these days. There are small ones suitable for postage stamp sized gardens or much larger ones. Decide what will work for you. Of course if you have a large garden space you can just start a compost heap. The trouble with these though is that they can attract rats and other vermin. A nicely lidded composter will be much safer. So:-
What you CAN put into a composter
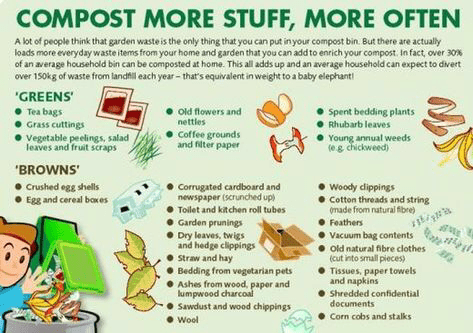 What you CANNOT put into a composter
Hints and Tips
Overall You will get a real buzz when you see what is basically rubbish or trash turned into something beneficial to your garden. Many of your plants will benefit from this rich compost and there is no trekking to the garden centre and paying over the odds for what may be a suspect product. Having your own compost on tap will boost your garden, save you money and help the environment, which these days is the real bonus. Even if you are not really into gardening composting is a great way of disposing of a lot of your waste and the cost is minimal.  If you love your garden then slugs are one of those creatures that can be an absolute pain. As darkness falls they will appear from behind walls, under planters, behind pipes or just about anywhere and start to wreak havoc on your garden. They will home in on certain plants and chomp their way through many of the leaves. They seem to have a voracious appetite which is selective in that they prefer some plants to others. Controlling slugs can be quite difficult as they seem to breed easily and quickly. Many of the over the counter products which you can buy in an attempt to control slugs can be very toxic. Having one dog now and others in the past, this writer never uses toxic-slug control; that has been in 40 plus years of home gardening. In England lots of people set 'beer traps' for slug control and this seems to be the traditional nom-toxic method. To do this simply pour a small amount of bitter beer or stout into something such as a saucer, and place it in the garden, where the slugs usually rampage. If it is a saucer with a high side the slug will crawl over the top and into the beer but not be able to get back out. Whether this is because the slug is drunk or not I am not quite sure. You can then humanely dispose of the offending slugs, and by this I don't mean throw them into your neighbour’s garden! Another good method is to put a small circle of sharp gravel around the base of your plant, in other words where it comes out of the earth. This should keep slugs away from your precious plants. Finally, years ago, people would throw salt on slugs as it makes them shrivel and die. Nowadays we are more humane and would not usually do that. Imagine you had an accident and a huge strip of your skin had been removed. Throwing salt into your wound is exactly what it must be like for the slug but for the slug it's all over their body and fatal; a very nasty way to go. Of course if you dare to pick slugs up you can remove them from your garden. I have a large composter and plenty of slugs live in there nicely making new soil for me. As long as they stay put and leave my flowers alone we co-exist quite nicely thank-you. More slug control advice online can be found at RSPB http://www.onewomansomanyblogs.com/this-and-that/used-coffee-grounds-fertilise-and-help-beat-slugs-in-the-garden |
Archives
March 2017
Categories
All
|
 RSS Feed