

 Like yogurt? Like really fresh yogurt? If so why not make your own?
We had a yogurt maker for many years but stopped using it sometime ago. It was cheap enough to operate but the yogurt always had an unpleasant gloopy sort of texture to it; well it did to me. Having seen adverts for the Easi-Yo yogurt-maker on QVC I was tempted but never got around to purchasing the kit. Then a little before Christmas I spotted one of the makers in Wilko; it had a variety of flavoured sachets of the powder to make the yogurt also available and so I thought what the hell. Essentially the Easi-Yo yogurt-maker works like a flask. They are available in a range of colours but I purchased a white one which also has some red on it. They are made out of durable plastic. Inside there is a loose stand and a pot to make the yogurt. You simply add the amount of water, usually 500 mils, to the inner pot before adding the yogurt powder to this. Screw on the lid of this inner pot then give it a really good shake. Add a little more water to the recommended fill line and re-shake. Now boil a kettle full of water to add to the outer flask. Make sure it is above the inner stand but not too high. That way when you add the inner pot full of the yogurt mixture the hot water will cover at least half of this. Replace the Easi-Yo yogurt maker lid and leave to stand for between 8 to 12 hours, or overnight. Once your yogurt is ready take the inner container out and put in the fridge to chill before eating. Hints and tips Our first attempt was still fairly runny after the 12 hours. So we had a re-think. It says use room temperature water to make the yogurt but our tap water was very cold as it was winter and drawn from outside. So for the second attempt I added a little of the boiling water, only a spoonful or two, when topping the mixture up and it worked. The product does have some information leaflets which may also help. But as a rule of thumb the yogurt will take a longer time to set in colder weather and a shorter time when it is warm. Leave the yogurt too long and it will become almost sour cream, which you may or may not want. If the yogurt is not at this stage it will keep for up to two weeks in the fridge. Easi-Yo also sell small pots suitable for storing the product but you may find them or similar cheaper elsewhere. Each sachet of the yogurt costs around £2.75 in the UK. So it is not cheap but it does contain tasty ingredients which are good for you. You only add water so the other costs are minimal. Better value multi-packs of the yogurts are sometimes available at QVC or other outlets. Overall though if you like yogurt that tastes good and is good for you they represent great value. https://uk.easiyo.com/ UPDATE: During the coronavirus pandemic this yogurt may be a good option. You do not add milk, just water. The Easi-Yo makers have been redesigned and are now more compact.
0 Comments
 As everyone knows, making Homemade Mashed Potatoes is easy isn't it?
Well it can be but it is also all too easy to end up with watery, runny potatoes or a pile of mash that is full of lumps. Getting your homemade mashed potatoes perfect each time is not difficult as long as you follow a few tried and tested tips With that in mind here is a simple 1-2-3 for getting perfect, homemade mashed potatoes every time. You will need:
Preparation
Getting Started Homemade mashed potatoes usually take about 20 minutes to cook. With the preparation time and time allowed for the process of mashing allow around 25 minutes in total. Keep this time in mind, so that you can make sure that the rest of your meal is ready at the same time. Mashed potatoes can be kept warm in the oven for a short time but, keep them warm for too long, and they will become dry and end up with a hard covering. Make sure that you have a large enough pan to accommodate the potatoes, without water boiling or splashing over the sides. Cover the potatoes with cold water. I like to season the water with a little salt but it is up to you. Homemade mashed potatoes will need some salt, at one stage or another, for them to be tasty. If you are cutting back on salt try a low sodium version or sea salt. Cooking the potatoes
Getting ready to mash the potatoes
Mashing the potatoes It is really up to you and how confident you feel. My Mum only ever used a large table fork to mash potatoes and she always made perfect mash. This does need a strong arm though.
To serve Serve as soon as possible, so that your mashed potatoes are true perfection. Add a little garnish if preferred. The mash can be scooped onto the plate, squeezed through a muslin bag to make swirls or simply swirled with a fork. Again the choice is yours. The right potatoes for the job There are many varieties of potato. Some are just right for baking in the oven, others are more suitable for frying as chips. A few of the best varieties for making great, homemade mashed potatoes are:-
Nadine potatoes are a variety of potato which has a cream skin and cream flesh. It also has a firm, waxy texture. Nadine is suitable for:
Variations on plain mash
Additional information: Once you have mastered making perfect basic, homemade mashed potatoes, you can experiment and use your flair. More: http://www.deliaonline.com/recipes/international/european/british/perfect-mashed-potatoes http://www.thekitchn.com/5-mistakes-to-avoid-when-making-mashed-potatoes-212271  This is an easy Flapjack recipe that will give you at least 12 bars of flapjack in no time at all. I usually double up the amount of ingredients and use a larger baking tray. It is up to you. It does store quite well in a cake or biscuit tin, that is if it is not consumed as soon as you have finished cooking. It certainly wafts pleasant aromas around the kitchen, that is you like sweet food.
Ingredients For a 71/2 inch shallow baking tray you will need: 4ounces of butter or margarine. You can use a mixture of both 4 level tablespoons of Golden Syrup or as we often call it in the UK treacle. The pale coloured kind. 3ounces of sugar, granulated or brown sugar works well. 8ounces of rolled oats. I buy the large unbranded packs which are cheaper and less processed on the whole. 1/4level teaspoon of salt, adjust as suits. The ingredients can be prepared easily in ten to 15 minutes and the cooking time is around 30 minutes. I use a fan assisted oven which is an absolute pain. It can mean baking burns around the edges unless I keep a close eye on it. For me the cooking time is half. You will know best what your oven is capable of. The text book cooking time is 30 minutes with an oven setting of 335 degrees F or Gas Mark 3 Method
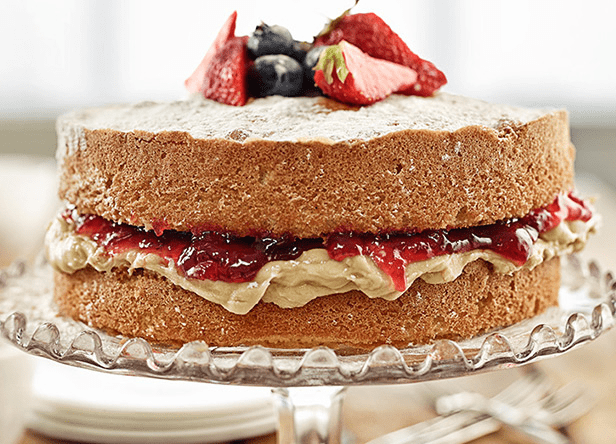
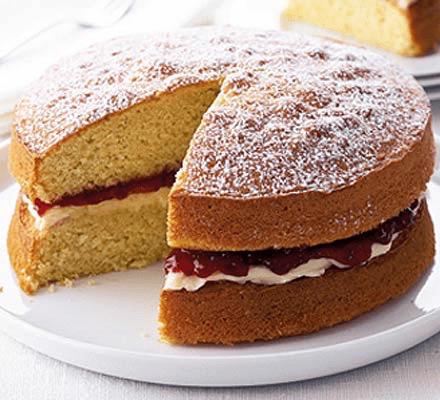
History of the Victoria Sponge Cake
The clue is in the name of this cake. The Victoria in question is Queen Victoria who reigned as Queen of Great Britain, and the British Empire, for the best part of the nineteenth century. In fact she reigned from 1837 until 1901. Isn't it funny how the longest reigning British monarchs tend to be females? Queen Victoria's reign was a golden age for some and there were many innovations. The Victoria sponge cake was invented as a sweet treat to accompany tea-time which was a new concept at this time. Anna, the Duchess of Bedford was one of Queen Victoria's ladies in waiting. She had this role for around ten years. During this time she found that, in the late afternoon, she would have a "sinking feeling" In other words she would feel very hungry. This was said to be due to the timing of lunch and dinner. The Duchess invented tea-time initially as just a time of the day when her servants would sneak her a few edible treats, to last her until the evening meal. Around 4pm they would provide the Duchess with a pot of tea and some bread snacks. In due course the Duchess expanded her tea parties so that they included guests, small cakes and petite sandwiches. By 1885 Queen Victoria was holding such parties herself and her guests were expected to wear formal dress. The Queen's sweet tooth soon guaranteed that the small cakes that were served became her favourite. Fittingly these small cakes were called Victoria sponge cakes, and still are to this day. The details below will make a cake that has ten to twelve average servings. Before you begin take out:
Pre-heat the oven to either 180C/350F/Gas Mark 4. Whilst the oven is warming line two 18cm or 7inch cake tins with baking parchment or greaseproof paper. You can use a hand mixer to cream the butter and sugar together if preferred. However, the traditional method is to use a large fork and plenty of elbow grease. Once the butter and sugar are creamed, add the eggs. These need to be beaten in. However, add a little at a time to make sure that the mixture does not curdle. If there are any signs that it is doing so, add a little of the flour. Add the rest of the flour by sifting it into the mixture. Fold the flour in using a large metal spoon. Traditionally folding flour into such a mixture needs a stirring motion with a large metal spoon or spatula. The stirring motion should be in the shape of a figure 8. To see if the mixture is ready, lift a little onto the spoon and see how it drops into the bowl. When it is ready it has a dropping consistency. If the mixture is too stiff add a little milk. Take care not to add too much though. Add a teaspoonful at a time. This mixture then needs dividing as equally as possible between the two baking tins. Gently spread the surface of each with a flat bladed knife or a spatula. If preferred you can make one large, deep cake and slice it in half horizontally. Bake in the pre-heated oven for between 20 to 25 minutes. Avoid opening the oven door unnecessarily or the cakes may fall flat, instead of rising. Check that the cakes are cooked fully by inserting a skewer or long needle. If the skewer has some cake mixture stuck to it, the cake is not quite ready. Allow the cakes to cool slightly for around 5 minutes and then turn them out onto a wire cooling tray. Whilst the cakes are cooling tackle the filling. The cake filling: For a classic Victoria you will need strawberry jam and cream. More often than not a butter cream is used rather than a rich cream. However, the choice is yours. Once you have perfected making the basic cake, experiment with flavours and fillings. Ingredients for a simple butter cream:
Adjust the above amounts according to taste. How to make a simple butter cream: Beat the butter until it has a soft and creamy consistency. Add the icing sugar a little at a time. As you add a little icing sugar beat the mixture well. It is a good idea to add the icing sugar in three separate lots. The beating will prevent the butter cream from becoming lumpy. Add a few drops of vanilla essence if desired, to enhance the flavour, and mix thoroughly by stirring. Sandwiching the cakes together. The usual method is to spread the jam on the underside of one cake and the cream on the underside of the other. The side of the cake that has the best appearance is the top or the bottom surface of the cake. When you have spread the jam and the cream onto the cakes, lightly press the two cakes together. Do not use too much pressure or the cake may look uneven and the filling will seep out of the sides. Final touches Place a pretty paper doily onto an attractive plate. Centre the finished cake on this plate. Use a sieve or sugar shaker to sprinkle a dusting of icing sugar or caster sugar over the cake. More; http://www.maryberry.co.uk/recipes/great-british-bake-off-recipes/victoria-sandwich https://www.theguardian.com/lifeandstyle/wordofmouth/2013/may/16/how-bake-perfect-victoria-sponge-cake
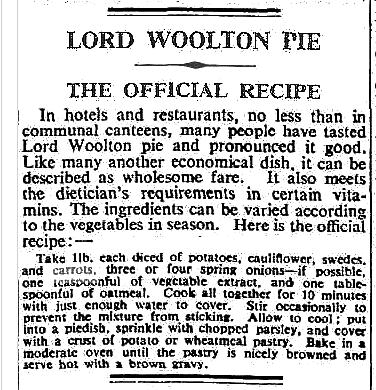
World War Two had been going for two years and rations were tight in 1941. This led to many UK householders growing what vegetables they could. Small gardens were utilised, large ornamental flower gardens were given over to vegetables and many people began to grow produce on council allotments.
To this day many people still grow an assortment of flowers and vegetables on allotments in the UK. They are harder to come by these days but still available. Housewives in the UK needed every bit of cooking ingenuity to create tasty, healthy meals out of the meager rations allowed in war-time. What is it they say about necessity being the Mother of Invention? It proved just that. New recipes were created and more than 60 years later some are being used once again.Finances are tight again and value for money is paramount. Forget expensive frozen ready meals an cook for good health and wealth instead. choose homemade meals for value and taste. How to make a war time classic - Woolton Pie Ingredients
Method The recipe then says wash and peel the potatoes and carrots cutting them into slices the thickness of a penny. This is an old penny though which has not been in circulation for many years. I would say slim slices are what they mean. Dry the washed sliced vegetables in a clean tea towel. Heat a little chicken fat in a frying pan and add the vegetable slices. Next treat the mushrooms as above. Finely chop the onion and leek. Add all of this to the frying pan. Mix together and add the seasoning above or your own choices if preferred. Make sure you only lightly fry the vegetables. Lightly grease a pie dish and add the whole mixture to it. Place the bundle of herbs in the middle of the pie. Moisten with a little giblet stock. Most of us would never use the giblets of a chicken for stock these days and many purchased chickens have them already removed. You could use a store bought vegetable or chicken stock though. Allow the mixture to cool. Pastry Ingredients
Bake in the oven for 11/2 hours. Check your oven guide for the best cooking times, for a vegetable bake of this kind. Eat and enjoy! http://www.carrotmuseum.co.uk/woolton.html
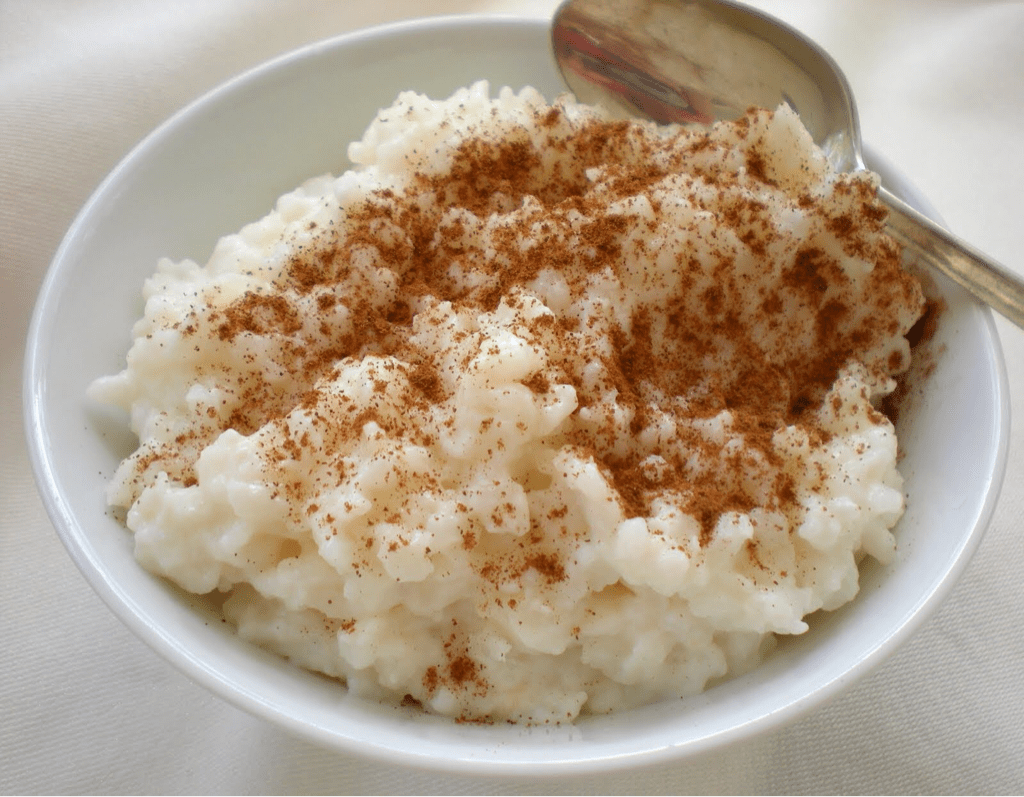
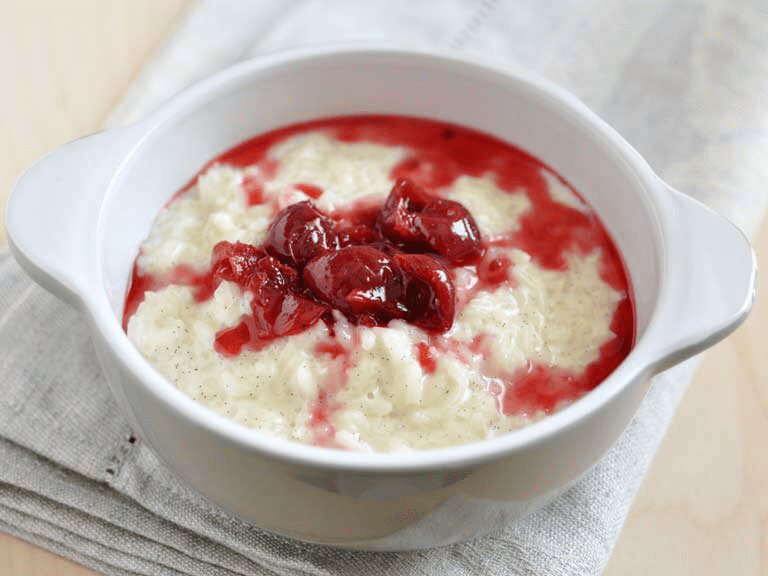
There are many variations on a traditional rice pudding, but this 1-2-3 is for a basic recipe. Once you know this recipe you can replace full fat milk with semi skimmed milk, use a jasmine infused rice and more.
Home-made Rice Pudding can be a little time consuming but it is well worth the effort. In fact there is very little effort needed and most of the time is due to the cooking time. So, let's get cooking! Ingredients
Preparation
Baking Stir the rice pudding mixture after 30 minutes. You may also want to turn the dish around, back to front, in the oven so that it cooks evenly. Cooking time in total is 11/2 to 2 hours or until the surface of the pudding is a nice golden brown and the pudding is creamy Alternative cooking methods On the hob:- Place the rice and milk in a large saucepan and bring to the boil stirring occasionally. Simmer for around 40 minutes or until the rice is cooked. If the mixture seems to be drying out add a little more milk. Add the sugar and nutmeg just before serving. In the microwave:- For a 650w microwave:- Place the rice and milk in a very large microwaveable dish. A three pint bowl should be large enough. Cook on full power for about 20 minutes. Stir occasionally. Remove when cooked and add the sugar and nutmeg before serving. Stir well and leave to cool for a couple of minutes before actually serving. Do not leave either of these dishes cooking completely unattended in case they boil over. Both of these recipes cut the cooking time. They make a tasty rice pudding but are not, in my opinion, as tasty as the traditional, oven recipe.  For those of you who are unsure just what carrot cake is: Carrot Cake is a lovely, rich, moist, sweet cake that tastes nothing like carrots.
What's it all about? However, carrots are used in this recipe, along with a host of other ingredients. This gives Carrot Cake a unique texture and flavour. Get the amounts wrong though and you could end up with a soggy mess. Carrot cake can be made in round bun cases, small individual squares or as a large round or square cake. It can be shop bought and, though generally these are good, there is nothing to beat good home made carrot cake when you fancy a sweet treat. The ingredients can vary a little and there is some leeway for those who do not like, for example, nuts such as pecans. These can be replaced with walnuts or simply omitted. To my mind Carrot Cake is delicious and it looks as good as it tastes. Getting Started
When thoroughly mixed together pour this mixture into the baking tin or dish Ingredients For a large cake that will slice into 18 pieces you will need:-
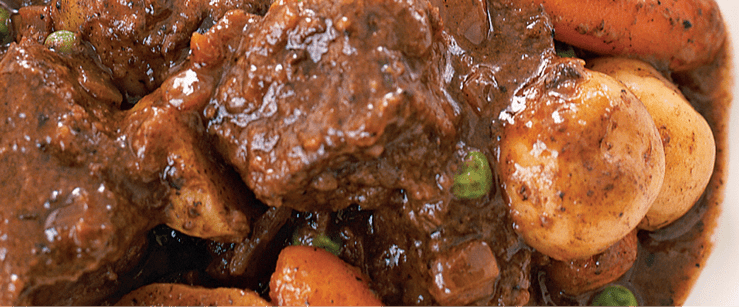 There are many recipes online which will show you how to make an economical winter-warming stew but this one is mine.
I bought a pack of diced beef from Iceland which retailed at £2. This will easily serve four persons or a stew for two over successive days. Stew is one of those cooked foods that just gets better with age. Remember to re-heat thoroughly and do not keep too long though. Like all cooked foods it can go off! Along with the diced beef I bought a pack of potatoes for £1.49 but only used half for the stew. A vegetable stew pack that contained a few carrots, small turnip, one onion and a decent sized trimmed leek was purchased for a £1. A quick cost then shows the basic ingredients cost me £3.74 roughly. Much cheaper than buying a handful of ready meals, more nutritious and better value for money. So we have our ingredients let's make a pan of tasty stew:
This basic stew is very easy to prepare, cook and serve. Add other veg such as frozen peas a few minutes before serving. Once you have mastered this very basic easy stew try adding dumplings or varying the ingredients. Tips:
Now you have mastered the basics check out Jamie Oliver's range of stews here. Also http://www.food.com/recipe/economical-beef-stew-407090 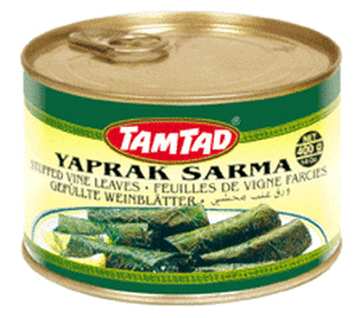 Stuffed vine leaves
Like Greek food? We love it. It is many years since we visited the Greek Islands but these days you can enjoy quintessential Greek Food if you live elsewhere. A Greek Salad is easy to make as long as you can buy Feta cheese. You can skip the cheese if preferred. Hubby and I always managed to share a Greek Salad which is served to tourists on the Greek Islands as a starter. He does not like cheese and I did not like olives, but I do now. One dish often served as a starter is stuffed vine leaves. At a hotel where we stayed on the island of Lefkas we would watch the owner reach up through the trellis to select leaves for the night's dinner menu. Dolmades means stuffed, by the way, and may refer to stuffed peppers or mushrooms. If you want quick and easy ready-made stuffed vine leaves they are available from many supermarkets. Asda in the U.K. sells a ring pull tin of stuffed vine leaves for around £1.45. The ones we buy are called Tamtad and are a product of Turkey. They are packed into the tin with oil. When drained the contents weigh 340g. Usually there are around 9 in each tin. When you compare this to the cost of dolmades as a starter in Greece they represent good value. Of course they are probably cheaper to make. The ingredients are :Grape Leaves , Onions , Water , Rice , Refined Sunflower Oil , Salt , Citric Acid , Mint , Dill , Spices. If you fancy going Greek have the stuffed vine leaves for a starter, a Greek salad for your main course and Total Greek yogurt with honey for dessert. Wash it down with a glass or two of retsina or ouzo. Follow with a small cup of strong black coffee; a traditional Greek meal at a reasonable cost. To capture the spirit of the Mediterranean make sure your salad vegetables are fresh as can be and be liberal with the virgin olive oil. 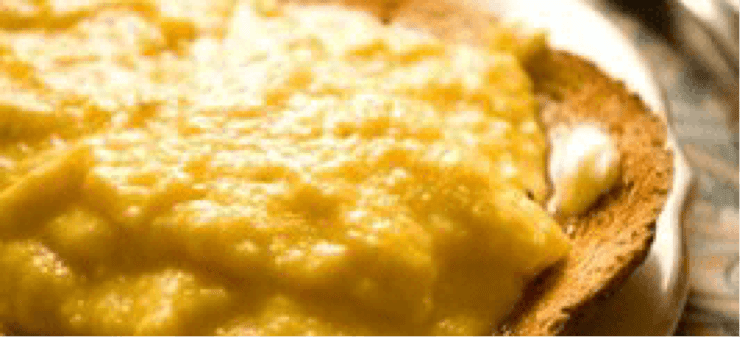 In the UK many years ago there was a concerted effort to ensure that the public ate eggs. Advertising slogans such as Go To Work on an Egg are still firmly stuck in this blogger's brain. A cheap and versatile food stuff eggs are also good nutritionally. Like all things there are pros and cons but if money is tight buying a half dozen eggs can be prudent.
One quick, easy and satisfying way to eat eggs is to scramble them. In the past cooking scrambled eggs invariably left too much mess stuck to the pan which could take ages to clean off. Enter the microwave. Cook your scrambled eggs in a dish in the microwave and cleaning up afterwards will be easy. Cooking scrambled eggs is a doddle but for those of you who are novice cooks read on. Remember to ensure that the dish you use is suitable for microwave cooking, For one person:
You can add various ingredients to the eggs. We like to add some grated cheese. Add too much and they will be rich creamy but very cheesy eggs. Finely chopped onions be they cooking or Spring, chopped tomato or ham also make for tasty scrambled eggs. Sometimes we skip the butter and add a dollop of cheese spread or one or two cheese triangles instead. The choice of course is yours. Bear in mind that you are only using a brief cooking time. This has a bearing on what you add. However if you want cheesy scrambled egg on toast you will find that they are cheap, easy and quick to cook. Make scrambled eggs when you have some ingredients which you want to use up also. Serving suggestions: Serve the eggs on their own, on toast, with chips or with bacon, sausages and beans. |
Archives
September 2019
Categories
All
|

 RSS Feed